
Overview Who Needs This? Excerpts Order Book Pictures Chapters
Answers Reviews Destinations Free Stuff More Contact Us
This page I wrote for my old rv website RVforSaleGuide.com before developing the Vanabode as the best travel vehicle for cheap easy long term road trips. People still like big rv's despite the much greater cost and trouble to operate, so here's what I know about them.
Rubber Roof
Rubber roofs require maintenance on rvs and campers. The most common rubber roof is typically referred to a specific type of roofing material that is made of Ethylene Propylene Diene Monomer (EPDM). The crucial component for the maintenance of the quality of such roofs is to avoid using harsh abrasive materials and petroleum-based solvents for their maintenance. The above listed materials can considerably damage the EPDM rubber roof by seeping into the material membrane and liquefying and melting the material creating a patchy look and decreased quality. The EPDM products and membranes produced by the company named Dicor are known for their quality and longevity.
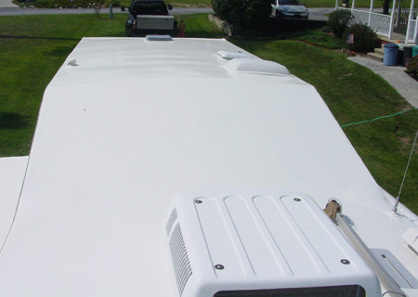
Butyl rubber sealant is especially effective for filling up the roof bubbles. For that purpose disposable syringes seem to be the best fit. To repair the bubble, you need to inject some of the sealant material into the bubble and distribute it evenly. Once you have flattened the surface, you need to put something heavy on it to fixate it while it is drying. Butyl rubber sealant is also very effective for rubber roof repair and for maintenance of your roof membrane (especially around the edges). It is especially critical to have the roof membrane fixed, as a lot of fixtures (i.e., air conditioner vents, plumbing and other pipes, etc.) can considerably loosen it. It may be especially problematic to fix the EPDM material around the refrigerator vents. The sloppy installation of such vents during the construction stage is usually the reason for such problems (i.e., inadequate securing of the whole, too big of an opening being cut, etc.). An RV rubber roof can last for decades if installed and taken care of properly
It is a complicated procedure and it requires a lot of patience. You need not worry if you have a couple of bubbles on your roof. However, if it bothers you and you want to fix them, you need to be certain your caulking or dealing materials are made of butyl rubber. Never pop or cut the bubbles. It can result in leaking roof and other resulting damage. It is healthier for the quality of the roof if you just leave them untouched. Visit RV trailer repair on replacing a roof.
Refrigerator installations are especially notorious for being troublesome among the RV manufacturers. This leads to lack of ventilation flow, and often results in malfunctioning refrigerators. Special caution must be taken while cutting a hole in the roof for that purpose, otherwise your refrigerator can be destroyed by a variety of things falling into a loosely cut hole. Take time to examine what is happening under the vent of your roof. An occasional bubble is pretty common, except when you have a lot of them. If you do have a great number of roof bubbles, examine the ingredients of your roof cleaning products and the quality of roof installation. Proper care and maintenance will ensure a long life to your rubber roof.
RV Rubber Roof
An RV rubber roof is not made of a cheap material. Installed properly and maintained with the utmost care it can be essentially leak-proof for about 30 years. The rubber membrane will flex a bit with weather and temperature but how can you go wrong when it comes to taking care of your RV coach. There are very strict rules to maintaining as well as installing a rubber roof coating and these issues are discussed.
The company that makes most of the EPDM rubber roofs does not apply the material to the RV. It is actually the RV manufacturer and less likely an RV dealer. The most troublesome areas for the manufacturer to install the rubber roof coating is around the refrigerator roof vents. After cutting a hole for the vent it might not be sealed properly along the edges which causes air flow to be restricted due to the heat that flows up through the vent which in turn is not allowing the refrigerator to cool properly. Read more on rubber roof repair and maintenance for rvs, campers and trailers.
On RVs, campers, and trailers you can use butyl rubber sealants for roof vents, roof edges under trip strips, air conditioning openings, and plumbing vent pipe holes which are all subject to loosening at the edges of the rubber membrane. If you find bubbles on your rv rubber roof it is highly advisable to leave them alone. Most roofs will have very few bubbles and they are usually cosmetic and can be left alone without further trouble. However, use extreme caution when walking with shoes and equipment on your roof so that you don't tear any open. It is not advisable to cut slits or poke holes in them to inject sealer as this can lead to further damage. But if you insist on fixing the bubbles then you need to purchase a product that reads specifically, butyl rubber caulking/sealant. Don't go cheap and buy a sealant that generically states for use on all rubber roofs. However, if you have a tremendous amount of bubbles on your roof then you have a serious problem either due to poor installation or the use of a petroleum-based cleaning product at one time.
First, let's go over how to maintain your rubber roof coating. As discussed earlier harsh cleaners are not allowed so for normal cleaning purposes you can use mild dishwashing detergent with a sponge for scrubbing. Never use a stiff wiry brush on any rv rubber roof. If you are parked under dirty trees long term then household bleach will work on the stains, but don't let it sit rinse it off well. The company that makes EPDM also makes an all-purpose cleaner that works well on tough stains. Over time there may be a slight discoloration of your roof but this does not hurt anything.
If you own an older RV and are interested in just recoating your rubber roof you can find after market kits available but they are costly. The work is no less really than reroofing your RV. You still need to remove everything on the roof to coat the rubber property or you will end up with loose edges and untreated areas. Preparation is exhausting but necessary if you want a leak proof roof. And not to discourage you further, you will be applying a minimum of four coats of various substances for your work to be done right.
Now if you are taking on a bigger project like a trailer rebuild and repair then here is a list of do's and don'ts so that your rubber roof coating lasts a long time. Basically the rafters have to be level, without major imperfections, and be of adequate thickness. The rubber membrane sheet needs to be applied without any cuts or holes and carefully trimmed around all objects that protrude from the roof. To prevent the rubber roof from being penetrated from the underside, there should absolutely be no wood splinters, nails or screw heads sticking up from the roof line. Bubbles should not appear if the rubber adhesive is applied according to manufacturers directions, folded properly over roof edges, trimmed carefully and the molding applied properly. The best investment you can make to your RV experience is to get an rv rubber roof.


Home
Contact Us Copyright
© 2007-2016 Free
Guide They Hate Me
Privacy
Policy Terms
and Conditions Media
Press Affiliate